Create an Availability Group
Introduction
During this lab, you will learn how to create an availability group using the JOIN ONLY option. After creating an availability group, you will create an availability group listener which your applications will use to connect.
Objectives
At the end of this lab, you will be able to:
- Pre-seed databases instances that will be secondary replicas
- Create an availability group using the Join only option
- Grant the requisite permissions in active directory to create a listener
- Create an availability group listener
- Know how to use the dashboard to view the state of an availability group
Estimated Time
40 minutes
Logon Information
Use the following credentials to login into virtual environment
Login to the AlwaysOnClient virtual machine as CORPNET\cluadmin using Pa$$w0rd as the password.
Click the Type Text icon to enter the associated text into the virtual machine.
Connect to AlwaysOnN1 as CORPNET\Administrator using Pa$$w0rd as the password.
Click the Type Text icon to enter the associated text into the virtual machine.
Connect to AlwaysOnN2 as CORPNET\Administrator using Pa$$w0rd as the password.
Click the Type Text icon to enter the associated text into the virtual machine.
Connect to AlwaysOnN3 as CORPNET\Administrator using Pa$$w0rd as the password.
Click the Type Text icon to enter the associated text into the virtual machine.
Connect to AlwaysOnDC as CORPNET\Administrator using Pa$$w0rd as the password.
Click the Type Text icon to enter the associated text into the virtual machine.
Change the screen resolution if required.
You may want to adjust the screen resolution to your own preference. Do this by right-clicking on the desktop and choosing Screen resolution and clicking OK when finished.
Screenshots in the lab instructions may appear with a lesser SQL version number than is installed in the lab environment where functionality is not affected.
Exercise 1: Pre-seed databases instances that will be secondary replicas
In this exercise, you will learn how to pre-seed databases instances that will be secondary replicas
Task 1: Connect to the SQL Server instances that will participate in the availability group
Login to the AlwaysOnClient virtual machine as CORPNET\cluadmin using Pa$$w0rd as the password.
Click the Type Text icon to enter the associated text into the virtual machine.
Open SQL Server Management studio (SSMS) from the taskbar

Connect to all three nodes: AlwaysOnN1
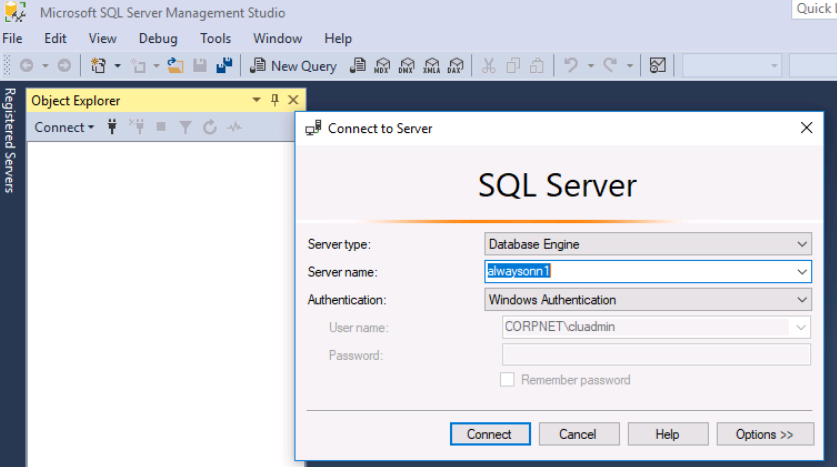
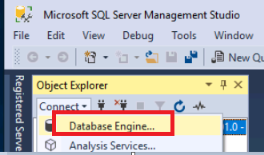
Connect to the other two nodes, AlwaysOnN2 and AlwaysOnN3. Click on the Connect button in the Object Explorer, and select Database Engine.
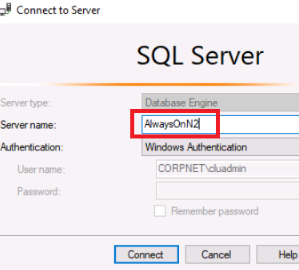
Enter AlwaysOnN2 and press CONNECT. Repeat step 4 and enter AlwaysOnN3.
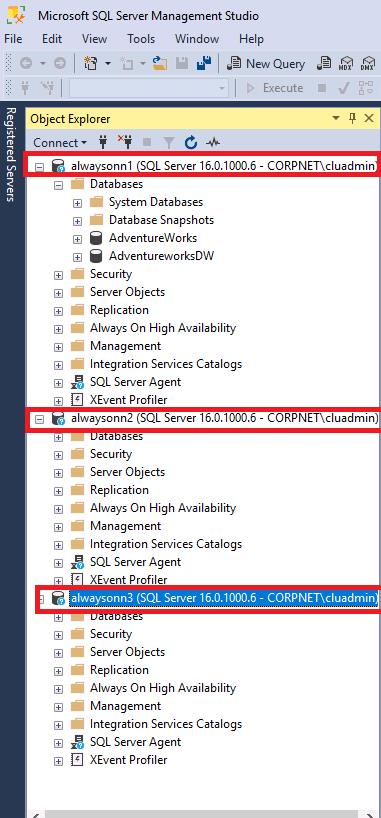
You should see all three nodes in the Object Explorer.
Task 2: Backup primary databases for ‘Join only’ initial synchronization
To be able to select 'Join only' option in the availability group creation, the databases should exist on the secondary replicas in a restoring mode. For that purpose, manual backup and restore of the participating database will be required.
Connect to the AlwaysOnN1 instance from SQL Management Studio.
Right click AdventureWorks database and select Tasks > Back Up….
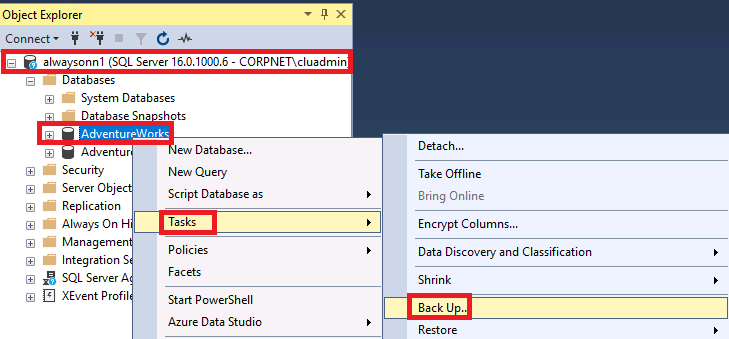
On the Back Up Database - AdventureWorks page, select the Backup type as FULL.

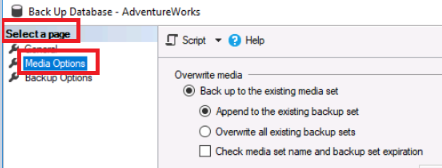
Under the Select a page section, click on the Media Options page.
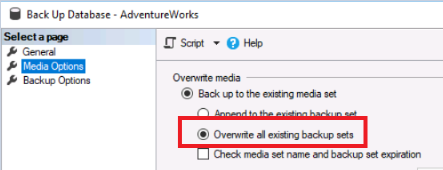
Under the Overwrite media option on the right, select Overwrite all existing backup sets
Click on the OK button in the bottom right corner of the window to start the backup. Proceed to step 7 of this task.
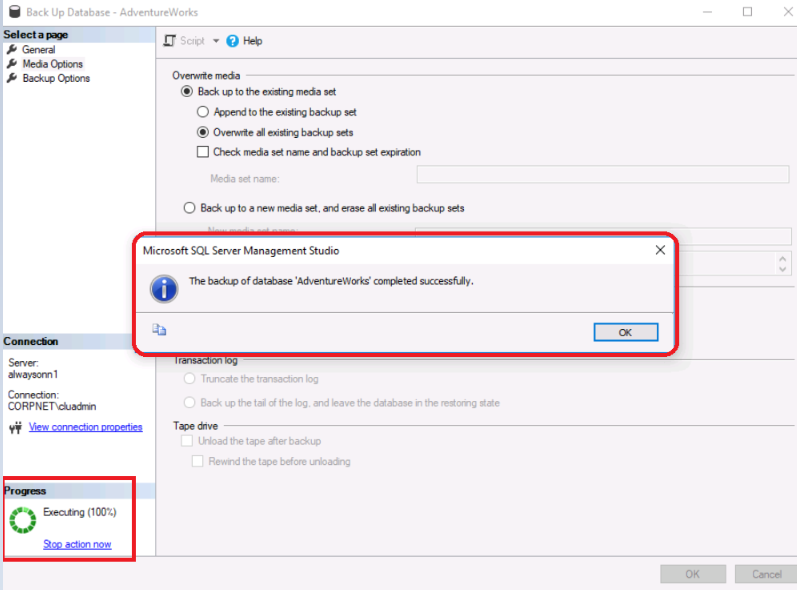
The progress section should reach 100% and a pop-up dialog showing successful completion should show. Press the OK button to close the backup window.
Repeat step 2 (only) for the AdventureWorks database again, so that a Transaction log backup can be performed.
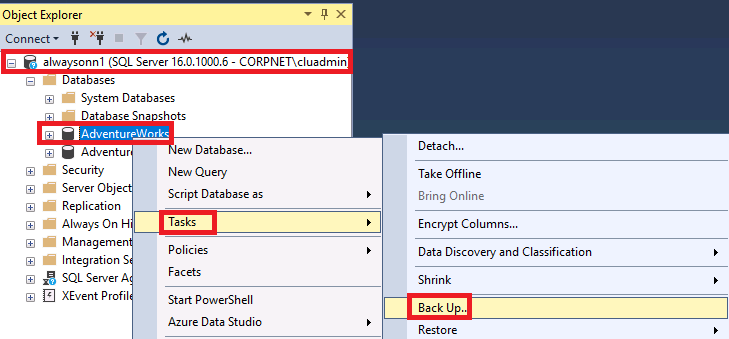
On the Back Up Database - AdventureWorks page, select the Backup type as Transaction Log and then press OK to proceed.
The transaction log backup will be appended to the previous file.
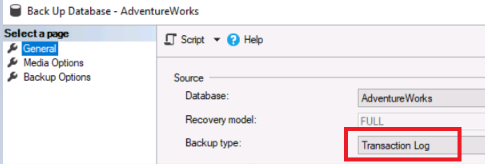
Repeat steps 2 through 7 in this task for the AdventureWorksDW database in order to create a FULL and a Transaction Log backup. When you do the FULL backup, make sure the options have Overwrite, and when you do the Transaction Log backup, use the defaults so that the log backup is appended.
Task 3: Restore database backups on the secondary replica
To be able to select Join only option in the availability group creation, the databases should exist on the secondary replicas in a restoring mode. For that reason, we will now restore the two databases whose backups were taken in Task 2 of this lab, AdventureWorks and AdventureWorksDW.
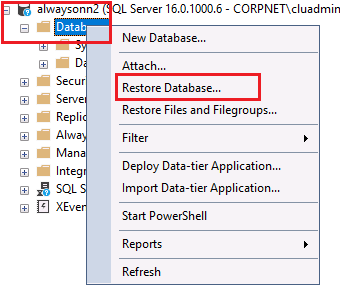
Connect to the AlwaysOnN2 instance from SQL Management Studio and navigate to the Databases node. Right click and select Restore Database.
Select Device in the main section of the General page and click the ellipsis on the right.
In case Network path throws error then either wait to path get resolve or copy backup files to local machine then try restoring the databases.

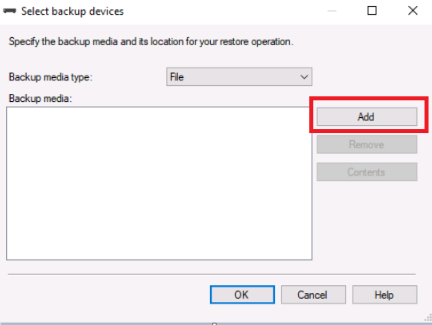
On the Select backup devices window, click the Add button.
On the Locate Backup File window, delete the text in the Backup File Location text box, and then type the following text and press the refresh button:
\\AlwaysOnN1\Backup\
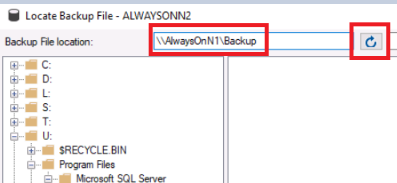
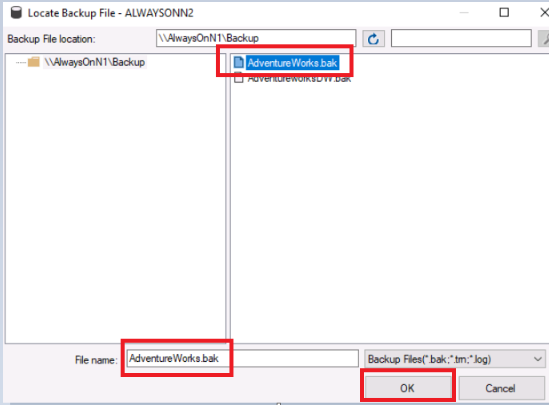
Then select the AdventureWorks.Bak file in the right pane which will file in the File name: text box. Press the OK button to continue.
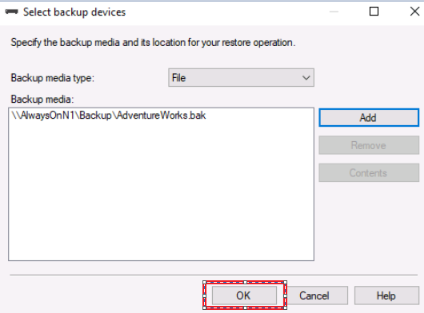
Now back on the Select backup devices dialog window, there should be a UNC path and filename present for the AdventureWorks backup file. Press the OK button to select that file and continue.
\\AlwaysOnN1\Backup\AdventureWorks.bak
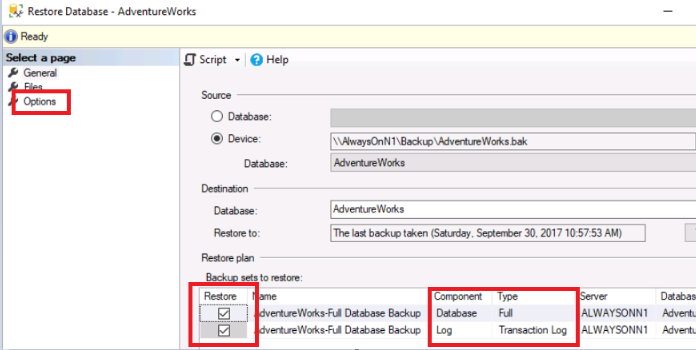
The Restore Database - AdventureWorks screen will now show two backups checked for Restore - the FULL and Transaction Log backups taken earlier. After confirming both backups are selected with checkmarks, on the Select a page section in the upper left, click the Options page.
Click the drop down for the Recovery State options, and select RESTORE WITH NORECOVERY.

Finally, click the OK button at the bottom of the screen to begin the restore of the AdventureWorks database.
Verify the restore completes successfully and press the OK button.
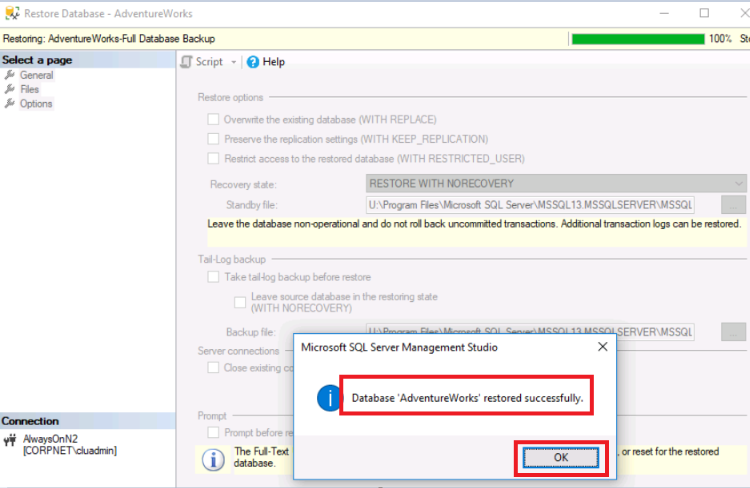
You should now see the AdventureWorks database underneath the AlwaysOnN2 instance in the Object Explorer of SSMS, and it should have a state of (Restoring…) next to it. The restore of this database on this instance is complete.

Repeat steps 1 through 11 again on AlwaysOnN2 for the AdventureWorksDW database.
Repeat steps 1 through 12 again to restore both databases on AlwaysOnN3.
Although not shown during the restore activities, the file paths for the restore operation used the same drive / folder structure as the primary. The paths are not normally automatically created, but for the purposes of this exercise they had been pre-created. In your own environments, though it is possible to restore the databases to different drives and/or paths, it is not recommended. The best practice is use the exact same drive/path locations on all nodes so that if there is an addition of a new data file for example, the path will exist on all nodes. If the path does not exist or cannot be created, steps such as automatic seeding will fail. should not be configured to listen on the same port.
Congratulations!
You have successfully completed this exercise. Click Next to advance to the next exercise.
Exercise 2: Create an availability group using "Join Only"
In this exercise, you will learn how to create an availability group using "Join Only"
Task 1: Create availability group using AlwaysOnN1 as primary
In SSMS Object explorer, click on AlwaysOnN1
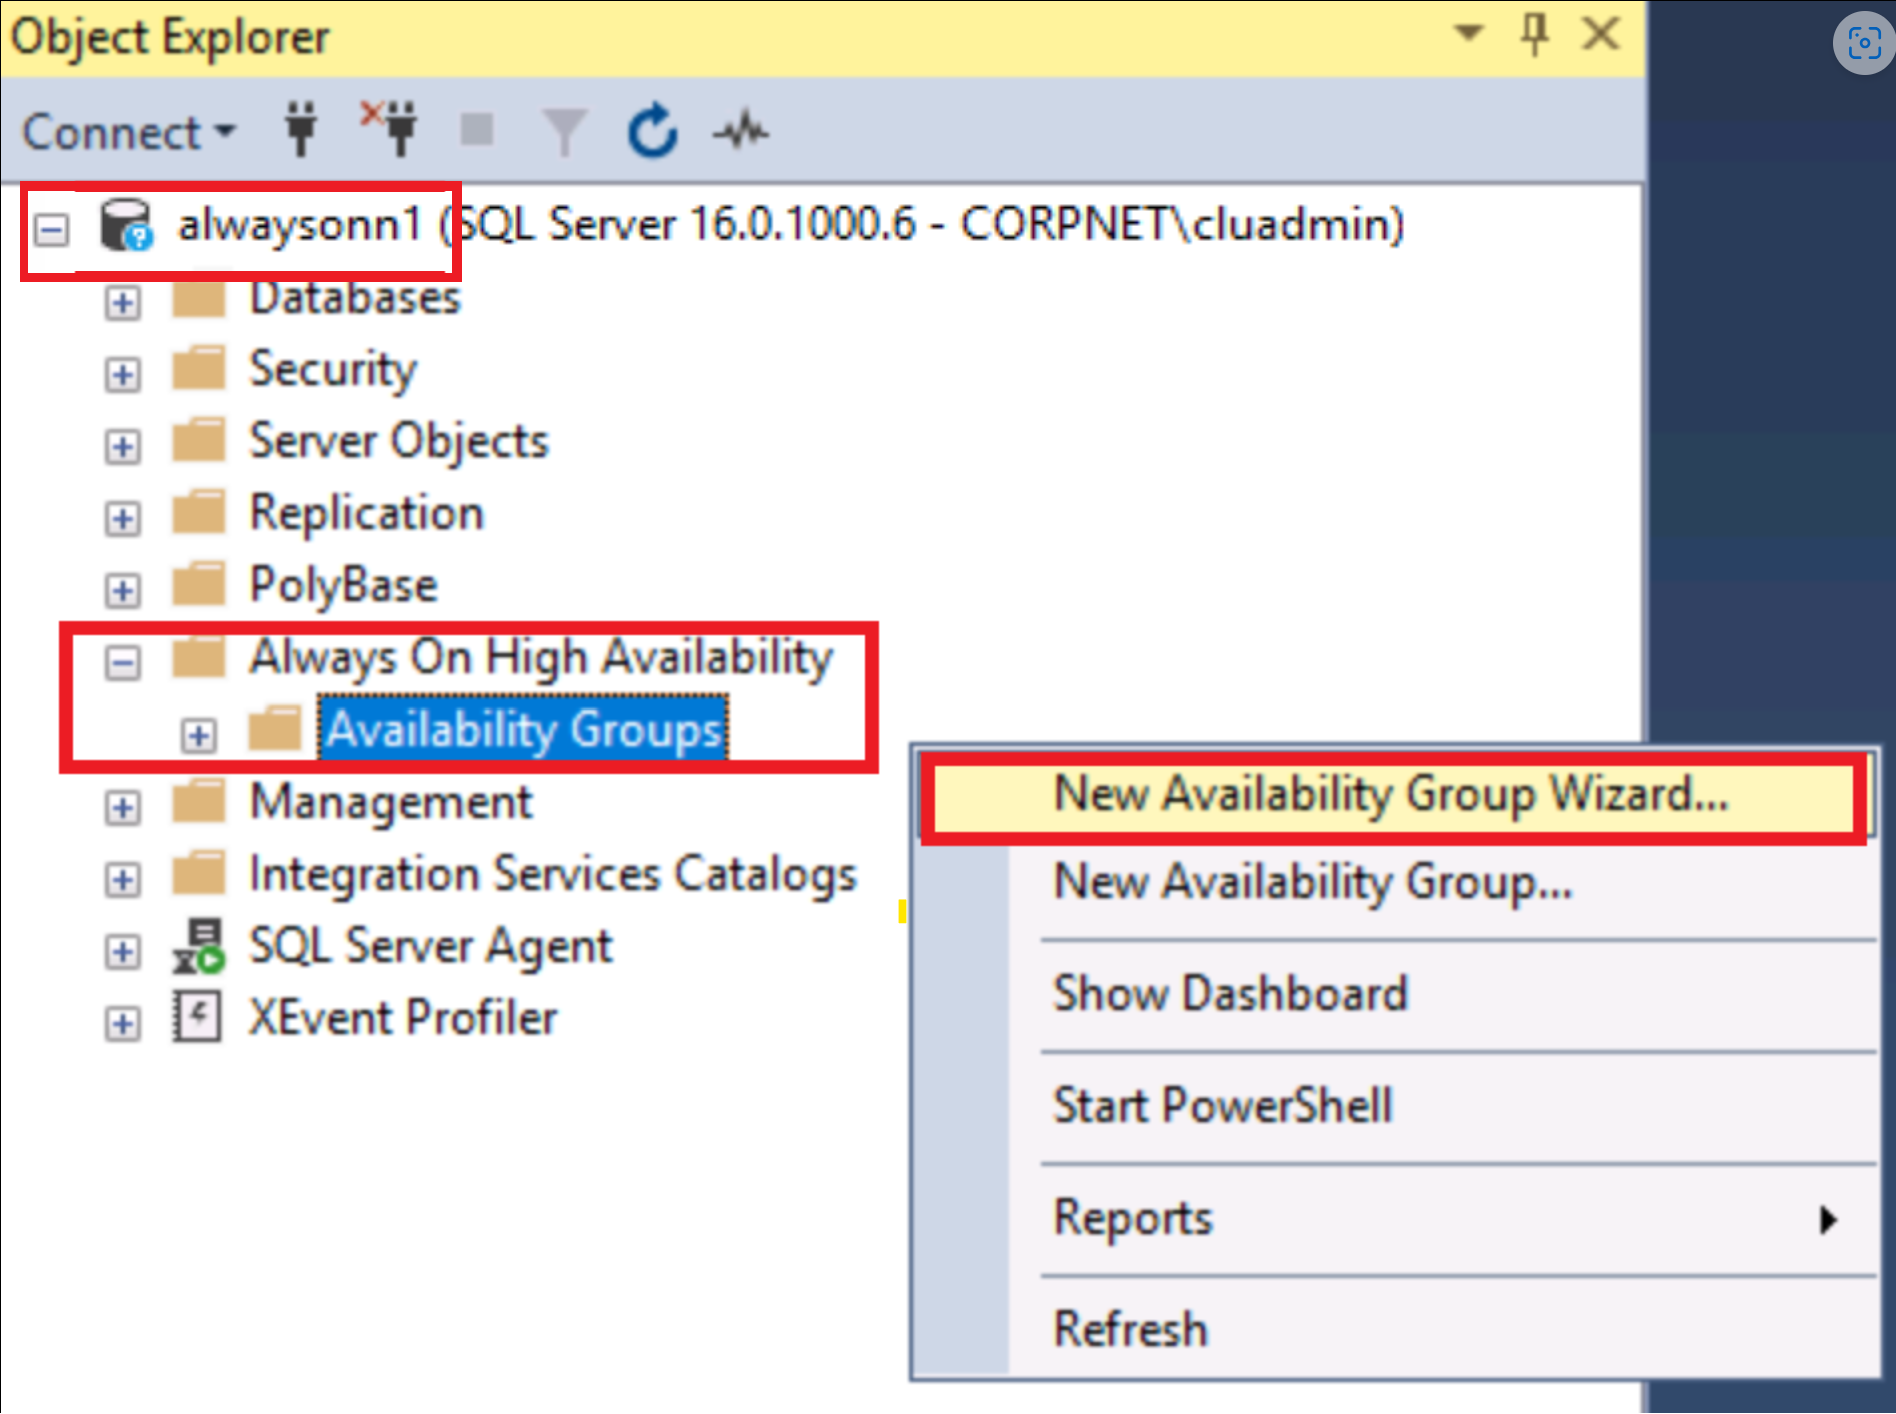
Expand the node if it is not already. Click the + next to AlwaysOn High Availability, then right click on Availability Groups and select New Availability Group Wizard.
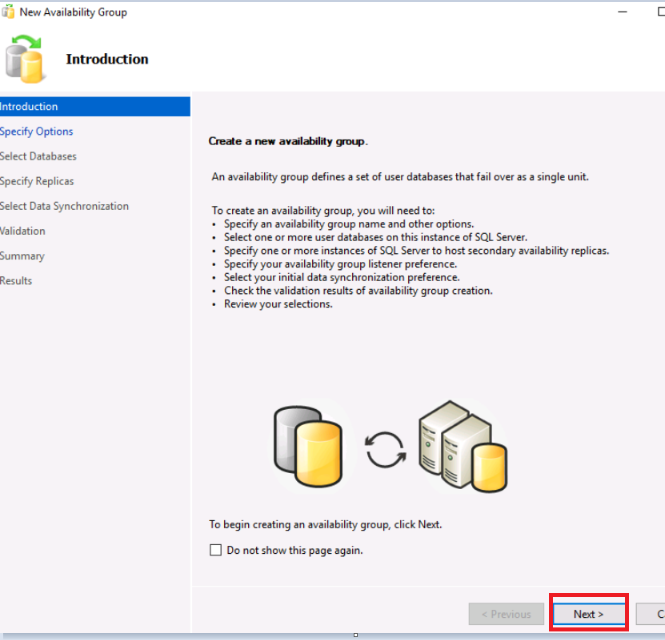
Click Next in the New Availability Group wizard Introduction screen.
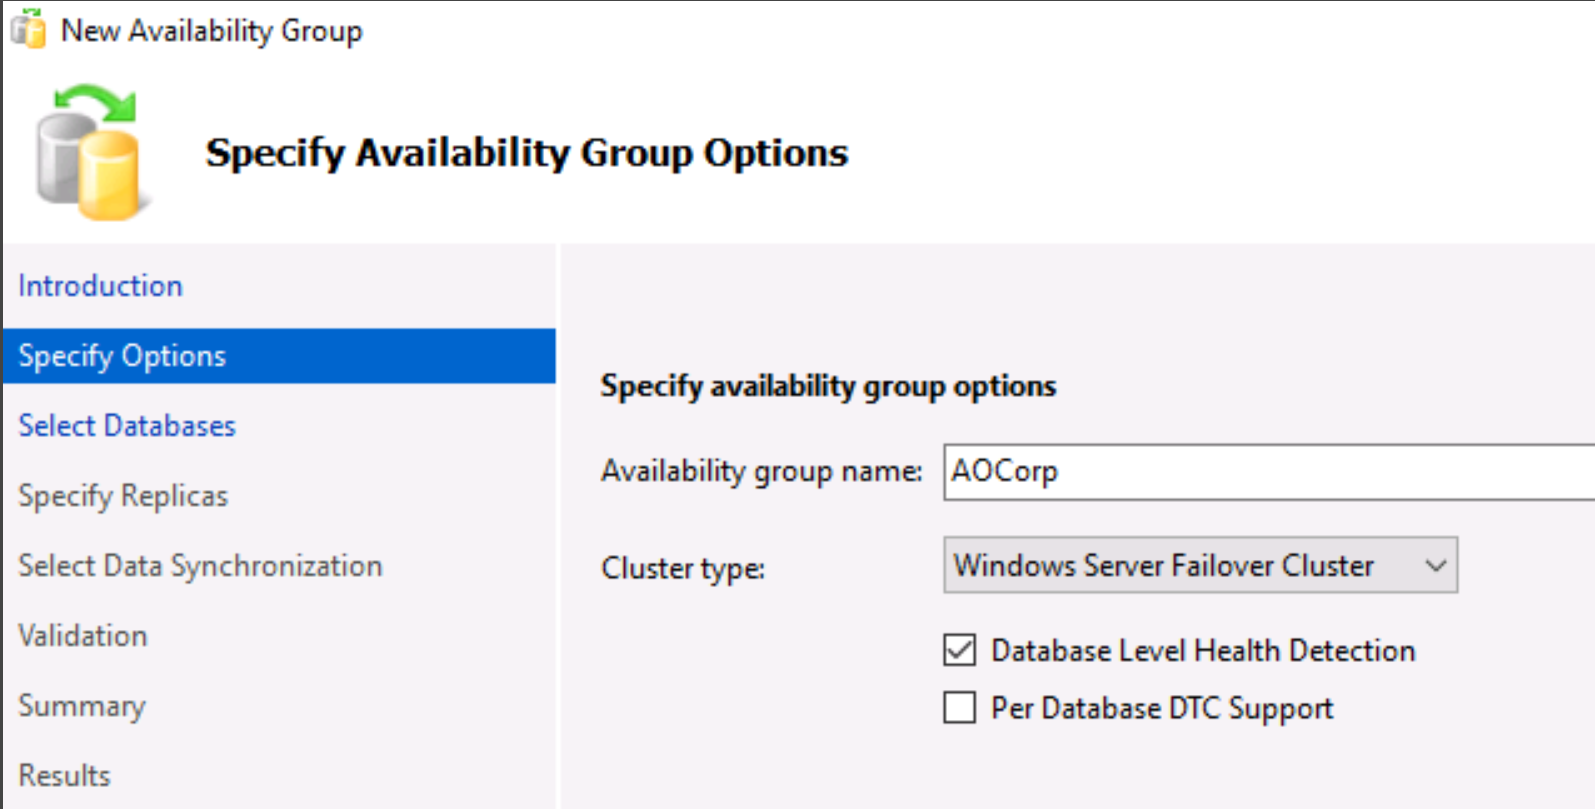
On the Specify Availability Group Options screen of the wizard, enter AOCorp for the availability group name, and check the option to enable Database Level Health Detection. After those two steps, press the NEXT button to proceed to the next screen.
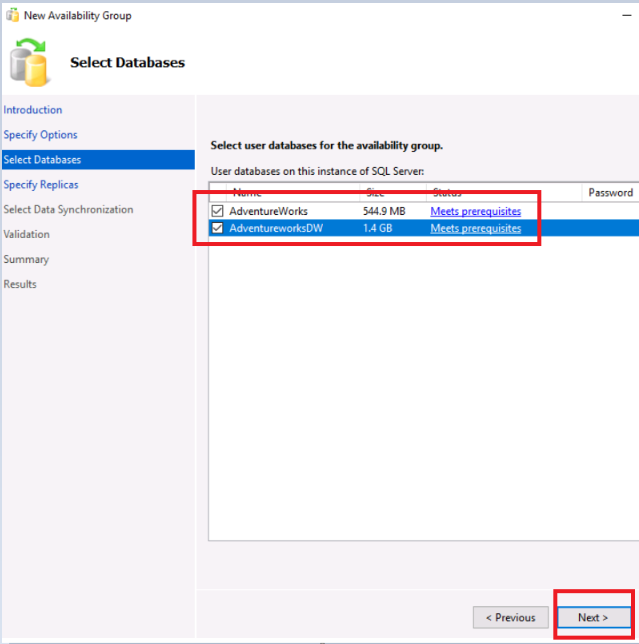
On the Select Databases screen, both AdventureWorks and AdventureWorksDW should show as Meets Prerequisites. Select both databases and click NEXT to continue to the next screen.
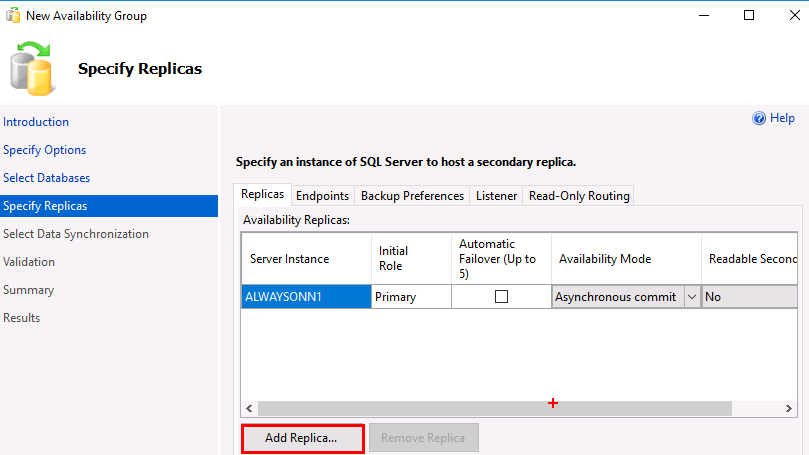
On the Specify Replicas screen of the wizard, we will now add the two additional instances, AlwaysOnN2 and AlwaysOnN3, to be secondary replicas in the availability group. Click the Add Replica button
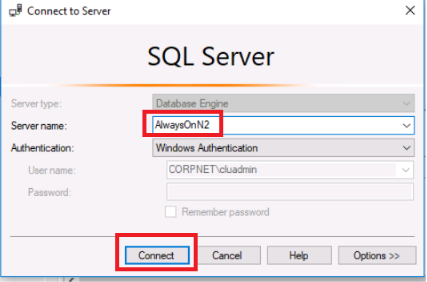
On the Connect to Server dialog window that pops up, type AlwaysOnN2 for the Server name: field and click the Connect button.
Repeat step 7 for the remaining node, AlwaysOnN3. After adding the remaining node, the Specify Replicas page should look like the following:
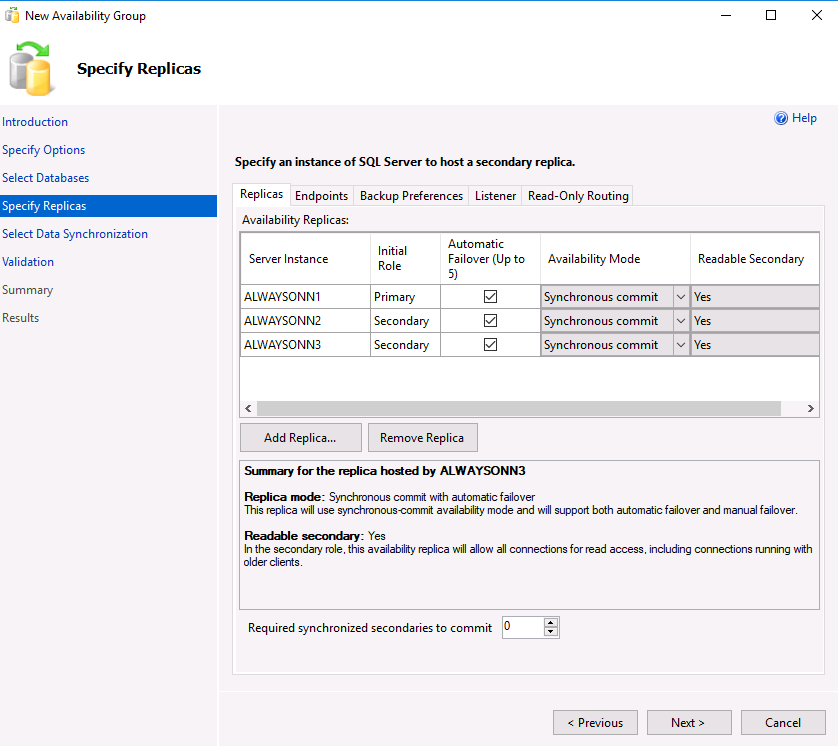
At this point, in your own environment you will make several decisions depending upon your needs. For this lab, we will configure each replica for:
- Automatic Failover
- Availability Mode - Synchronous commit
- Readable Secondary
In your own environment, your decisions may differ depending upon your environment and requirements.
At this point in the exercise, make the options of the replica page look like this by selecting the checkboxes and changing the drop-down boxes to select YES.
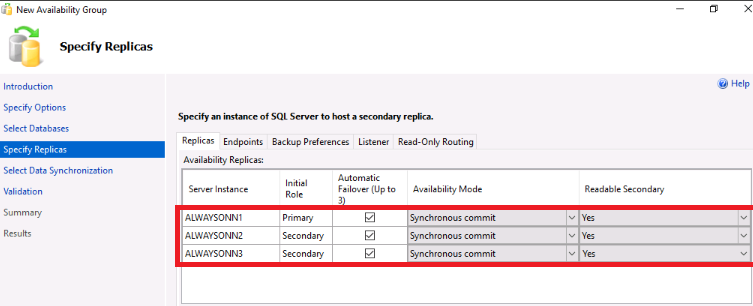
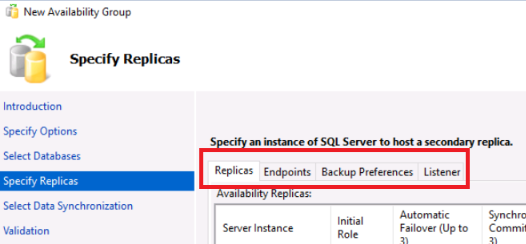
Before clicking the NEXT button, click on the other tabs to review some of additional options present. For this lab exercise, do not change any other options. Neither should you specify a Listener. It will be created later in this lab. After you have finished reviewing the other options present, click the NEXT button to proceed.
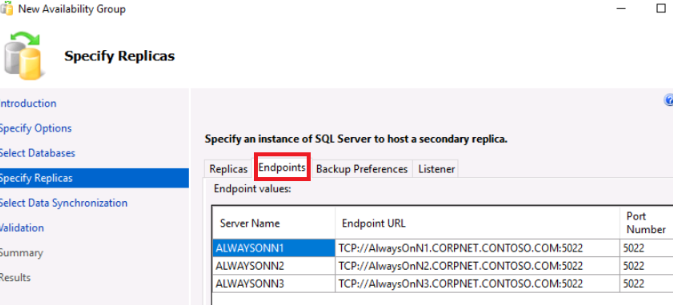
The Endpoints tab shows the Endpoint URL which is what each replica will use to establish the replica to replica communications between nodes.
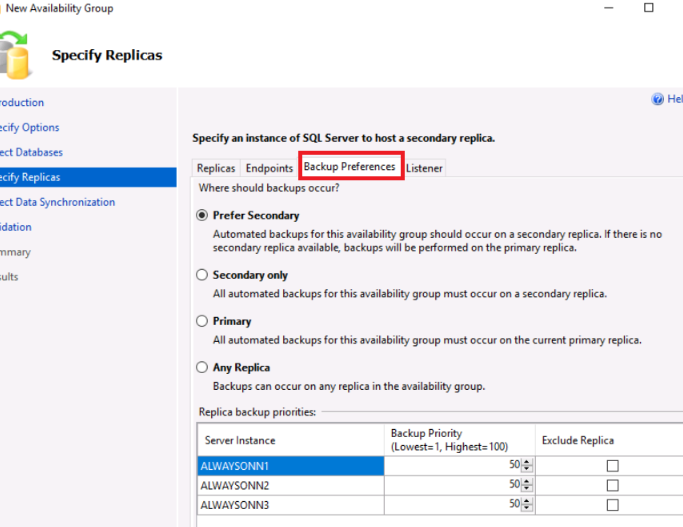
The Backup tab allows you to choose different backup behaviors between the various replicas in the availability group.
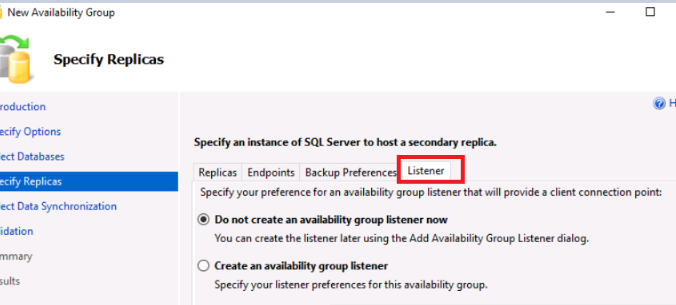
The Listener tab allows you to specify the virtual name through which applications will connect to the databases in the availability group. For this option, you need a virtual name and at least 1 IP address. For this lab, we will not create the listener just yet.
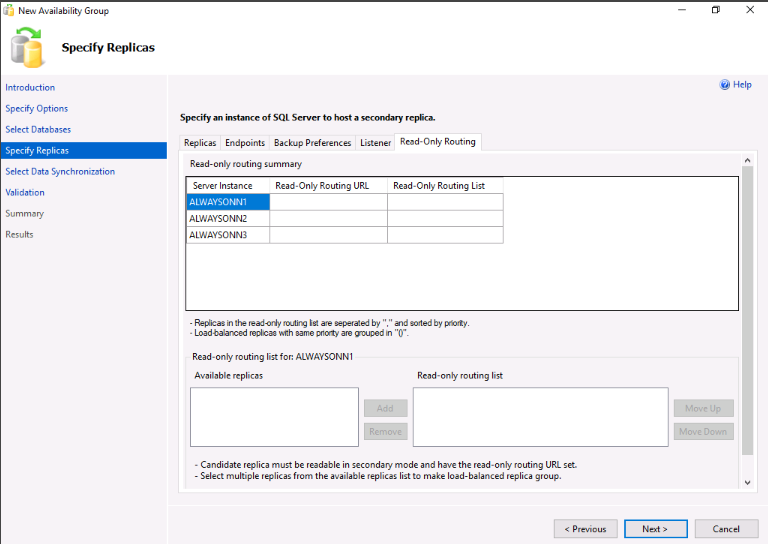
The Read-Only Routing tab allows you to configure the read-only routing list. For this, lab, we will not configure the read-only routing list.
At this point, click NEXT to continue to the next step.
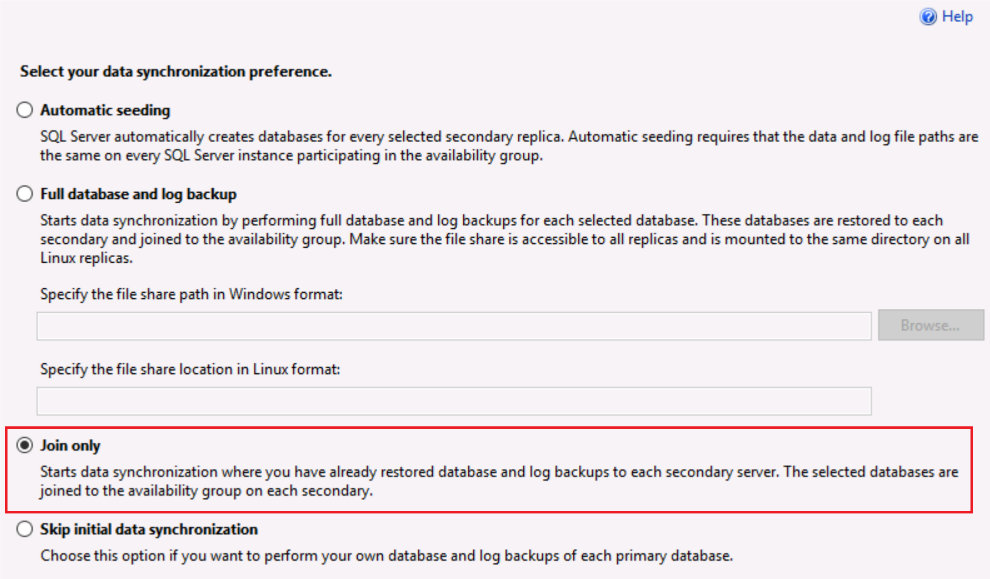
On the Select Initial Data Synchronization page of the wizard you will choose which method for seeding the secondary replica databases. The options are:
Option What it means Automatic Seeding SQL Server will automatically seed the secondary replicas, but it will stream the backup/restore process rather than creating a backup file on a share. Full database and log backup SQL Server will automatically seed the secondary replicas, but it will need a UNC path where it can store the backup files and then restore them. Join Only You have already seeded the databases by taking full and log backups and restoring them to the secondary replicas using "NORECOVERY" mode. This option is best for very large databases. Skip Initial data synchronization You will be required to seed the databases yourself at a later date, and to "join" the secondary copies to the availability group to begin synchronizing data. For this lab, choose Join Only since we have already taken backups and restored them, and then click NEXT.
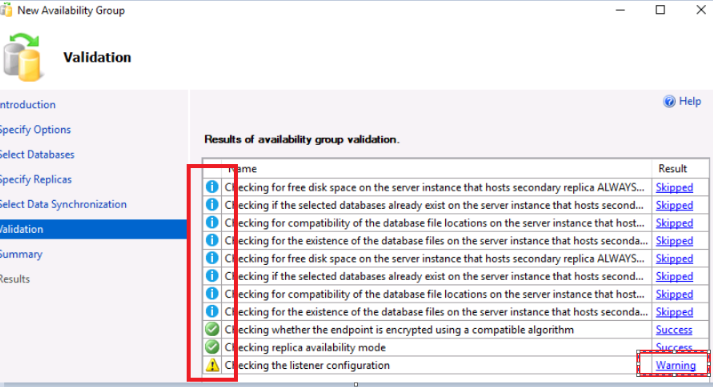
Review the Validation page of the wizard. If everything passes, the NEXT button will be highlighted and ready to click. Ignore the “warning” about the listener configuration but click on the warning link to learn more. Proceed by clicking NEXT when you are ready.

Review the final summary, which describes what SQL Server will do when it executes. You also have the option to SCRIPT everything SQL Server will do during the creation process. This is useful if you want to create multiple availability groups, or to track and save your activities.
After reviewing, press the FINISH button to begin creating the availability group.
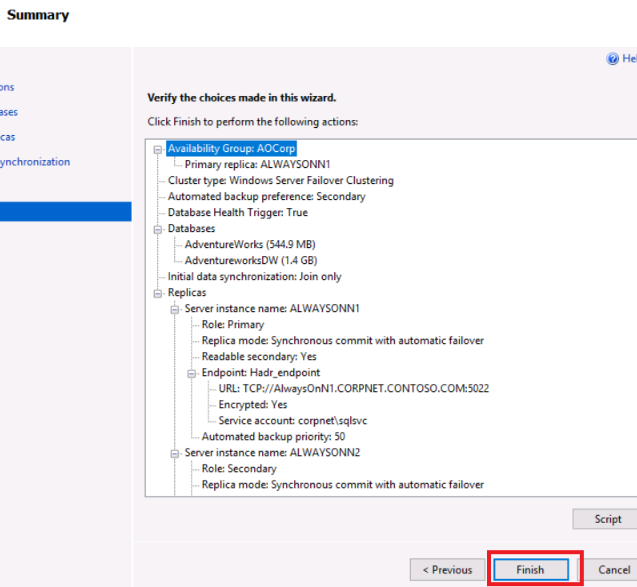
It has been reported that the script generated may not always include creation of logins on the various nodes that need to be granted permissions to the endpoints. In contrast, the UI Wizard will make sure all requisite logins for endpoint permissions are created. If you use the scripting option, please make sure the necessary logins are created on the respective nodes.
When SQL Server begins creating the availability group, click the more details button to see the details as it creates the availability group.
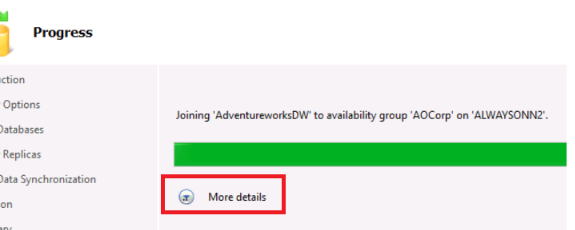
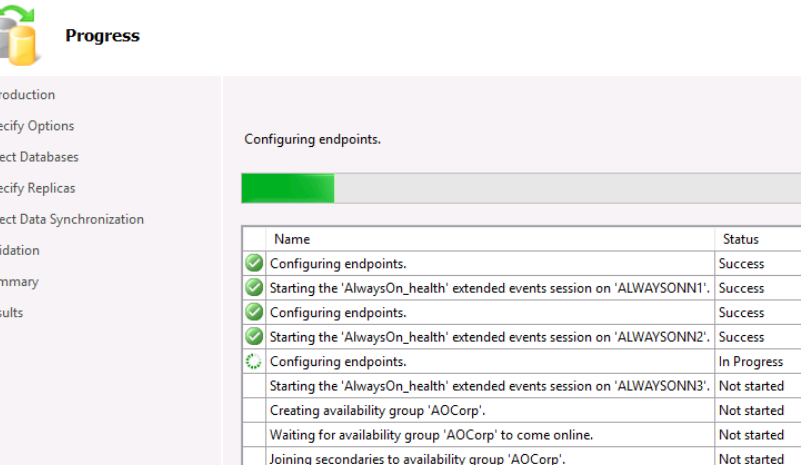
When the screen changes to The wizard completed successfully, review the summary details of creating the availability group and click Close when ready.
Congratulations!
You have successfully completed this exercise. Click Next to advance to the next exercise.
Exercise 3: Grant the requisite permissions in active directory to create a listener
In this exercise, you will learn how to grant the requisite permissions in active directory to create a listener.
Task 1: Grant Requisite AD Permissions to CNO account (AlwaysOnCluster$)
For the OS Cluster to create the virtual name for the listener, the CNO (Cluster Name Object) in Active Directory must have certain privileges. In this task, we will grant the permissions Read all properties and Create Computer objects to the CNO via the AlwaysOnOU container.
Perform this task on the domain controller AlwaysOnDC as Corpnet\Administrator using Pa$$w0rd as the password.
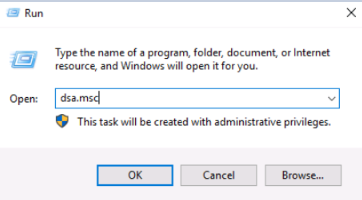
Open the Active Directory Users and Computers Snap-in (dsa.msc).
Open Server Manager. In the Server Manager Menu bar, choose Tools and then select the Active Directory Users and Computers menu item.

OR
Right-click the "Windows button", and select Run. Then on the dialog window type dsa.msc
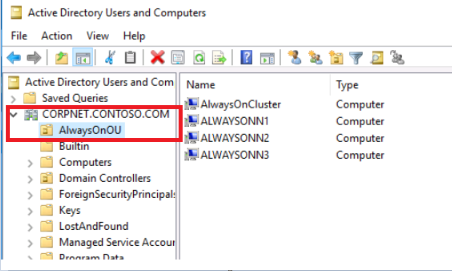
Locate the AlwaysOnOU container.
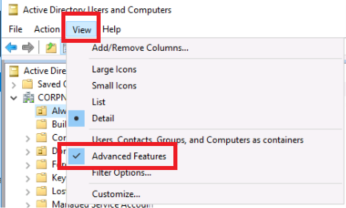
Click View and ensure that Advanced Features is checked as shown below.
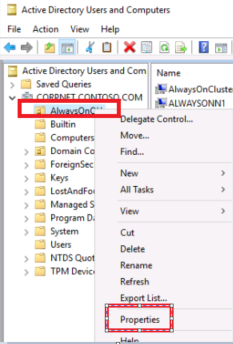
Right-click the AlwaysOnOU container and choose Properties > Security Tab.
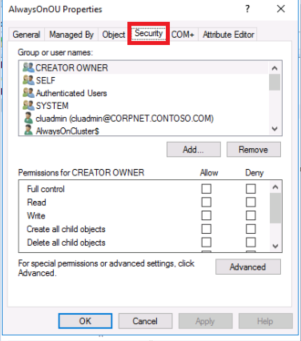
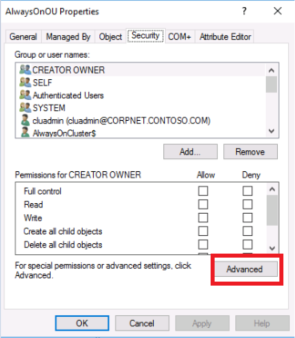
In the AlwaysOnOU Properties dialog, click the Advanced button.
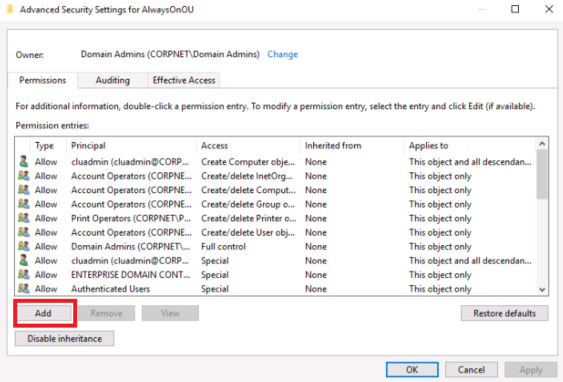
In the Advanced Security Settings for AlwaysOnOU dialog, click Add.
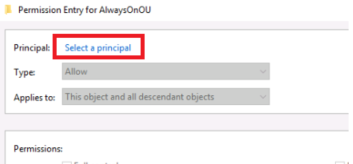
In the Permission Entry for AlwaysOnOU, click Select a principal.
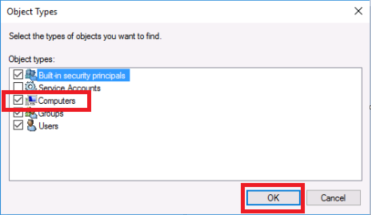
Click the Object Types
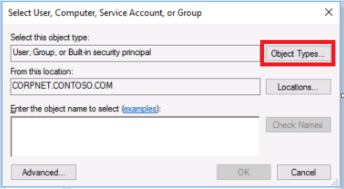
Click the checkbox next to Computers to select it, and then click the OK button.
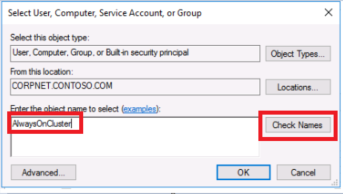
Enter the cluster name object (CNO), AlwaysOnCluster. Then click the Check Names button to validate. If successful, the AlwaysOnCluster entry in the text box will be underlined. Press the OK button to continue.
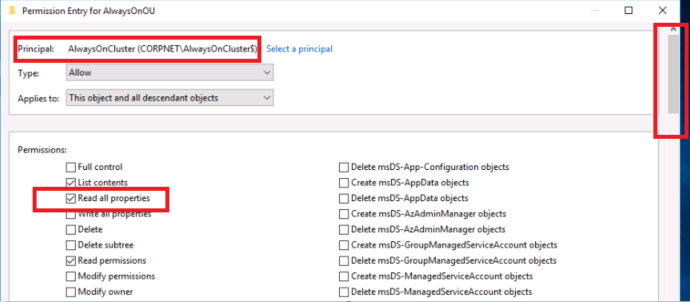
On the Permission Entry for AlwaysOnOU dialog, make sure that the principal says AlwaysOnCluster. Then make sure the Read all properties checkbox is checked. Then scroll down using scroll bar at right until you see Create Computer objects. Click the checkbox next to Create Computer objects and then finally click the OK button.
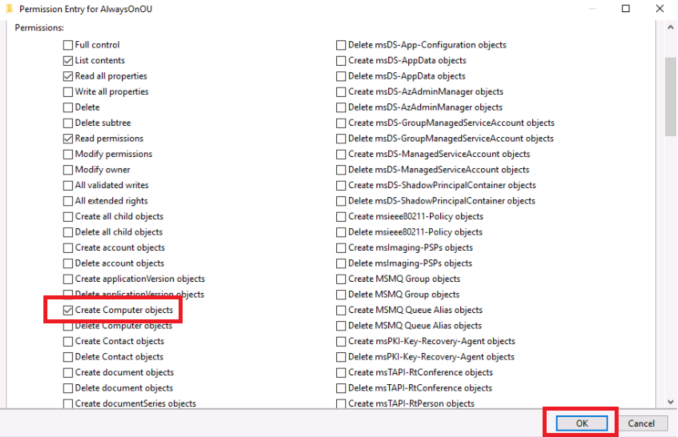
The Advanced Security Settings for AlwaysOnOU dialog window should now show an entry for AlwaysOnCluster whose access is Special. Click Apply and the OK and then OK again to finish.
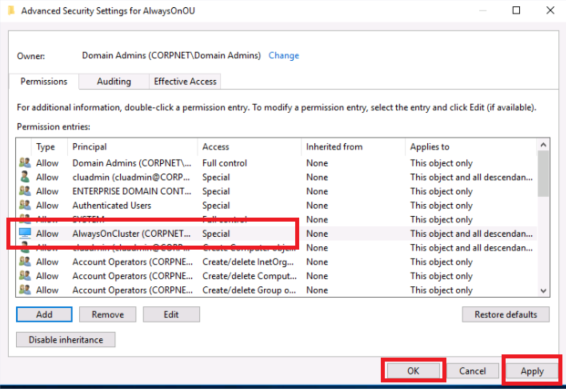
You may now close the program and log off from the domain controller.
Congratulations!
You have successfully completed this exercise. Click Next to advance to the next exercise.
Exercise 4: Create an availability group listener
In this exercise, you will learn how to create an availability group listener
Task 1 : Create an availability group listener
Login to the AlwaysOnClient virtual machine as CORPNET\cluadmin using Pa$$w0rd as the password.
Open SQL Server Management studio (SSMS)

Connect to all three nodes: AlwaysOnN1, AlwaysOnN2, AlwaysOnN3

On AlwaysOnN1, navigate to the AlwaysOn High Availability folder in the Object explorer and expand it. Then expand the Availability Groups folder to see the availability group we created, AOCorp.
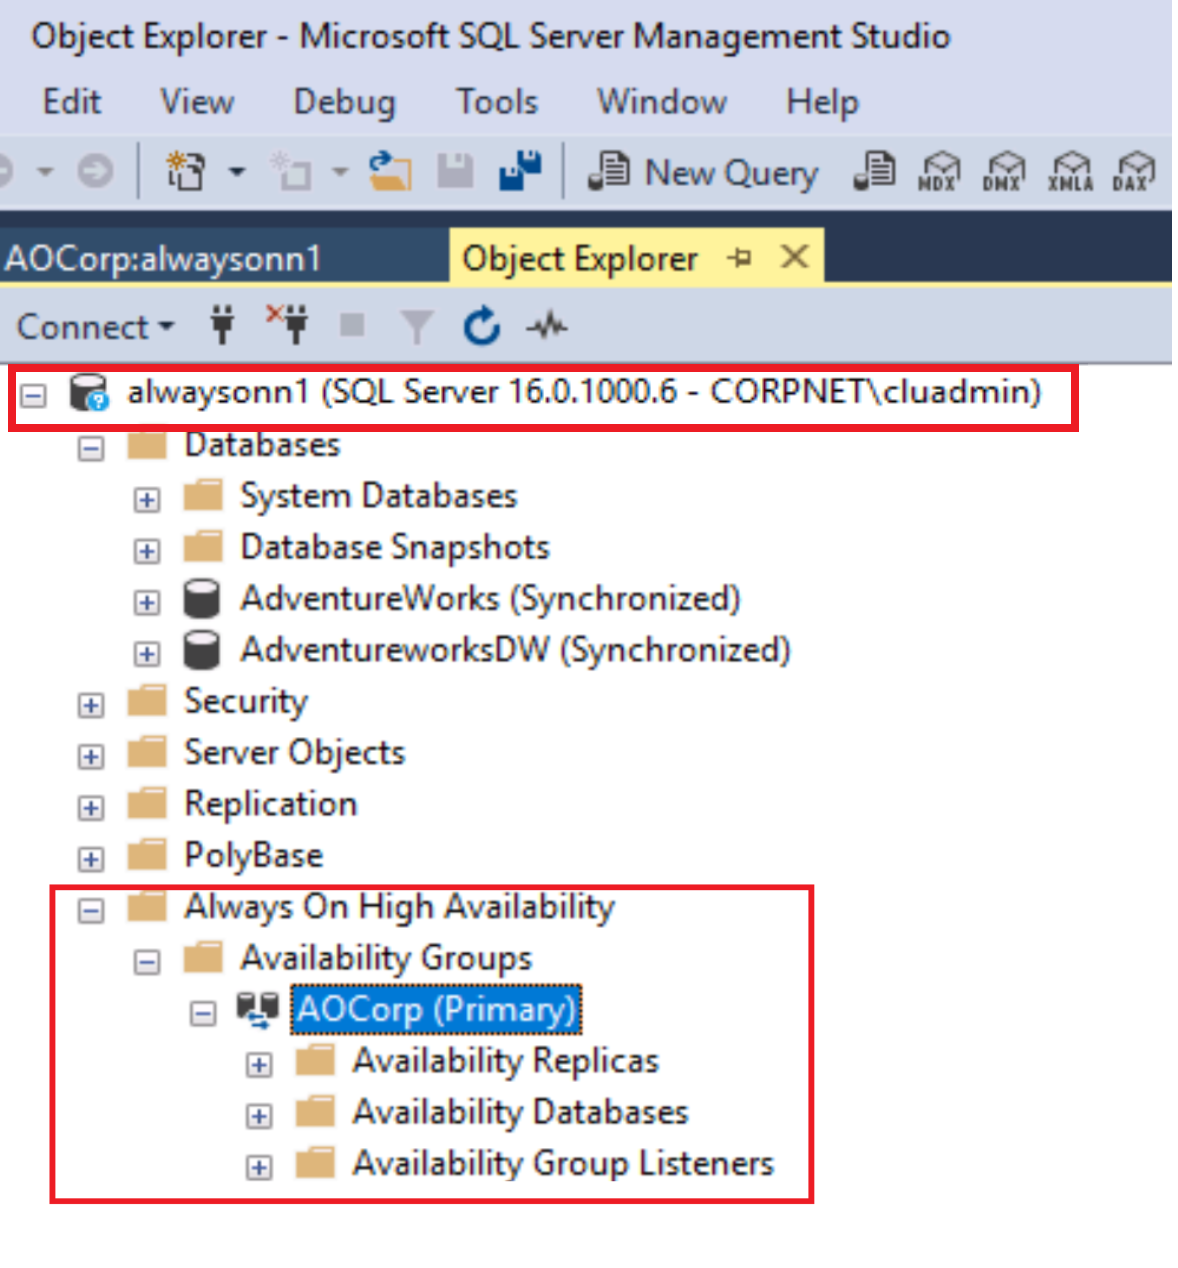
On whichever node (instance) shows the AOCorp availability group as Primary, expand the availability group to see its folders underneath.
[!note} This will most likely be AlwaysOnN1
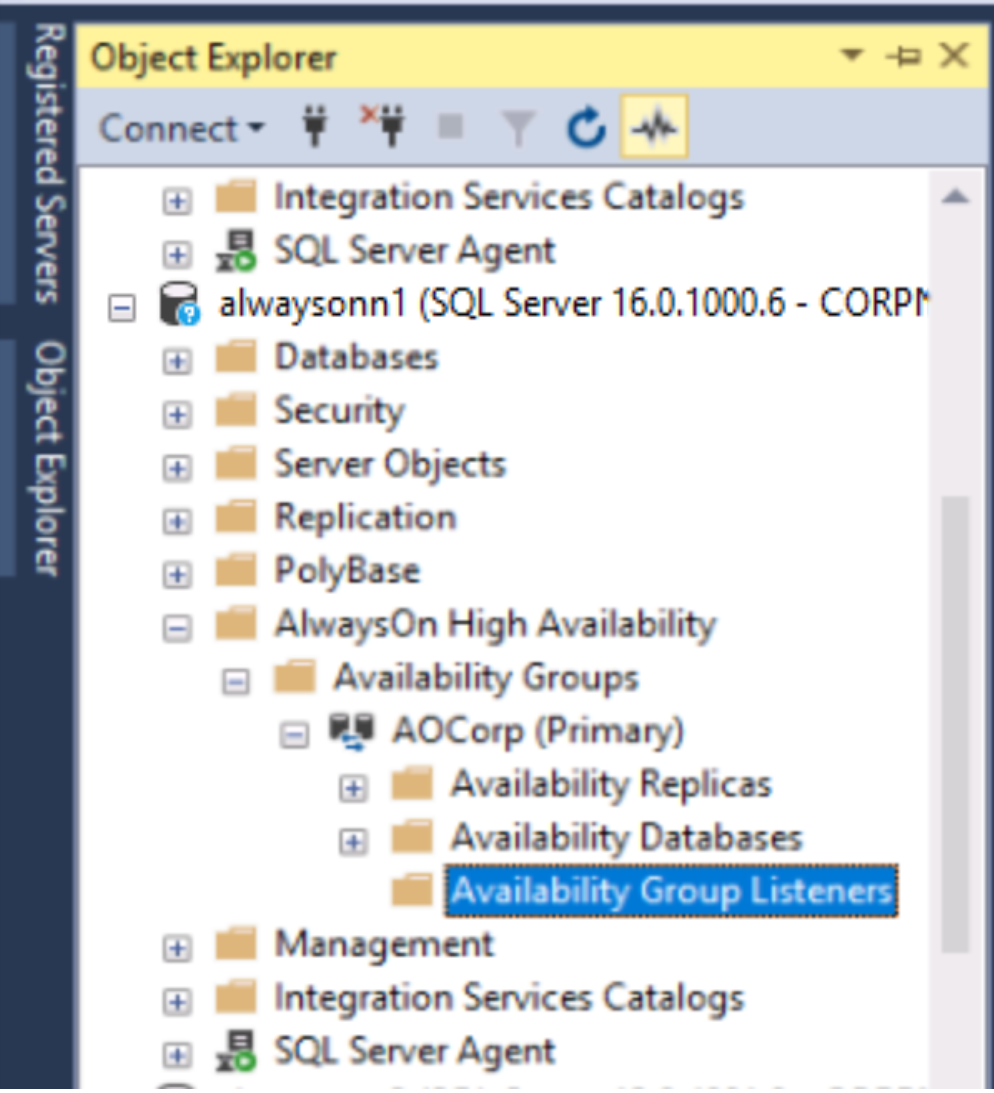
Right click the Availability Group Listeners and select Add Listener.
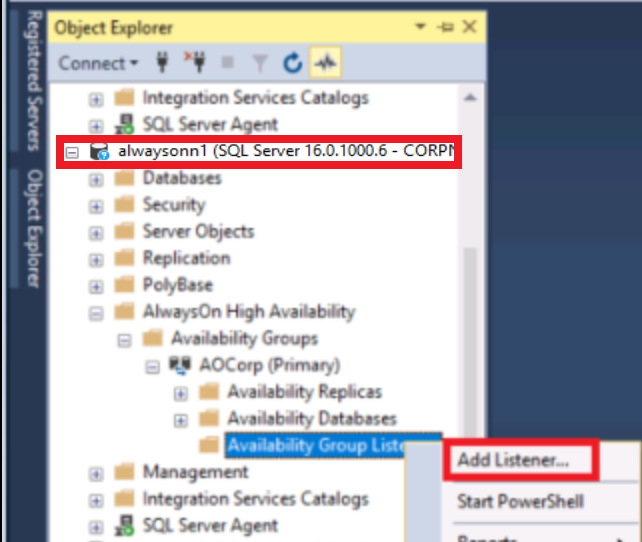
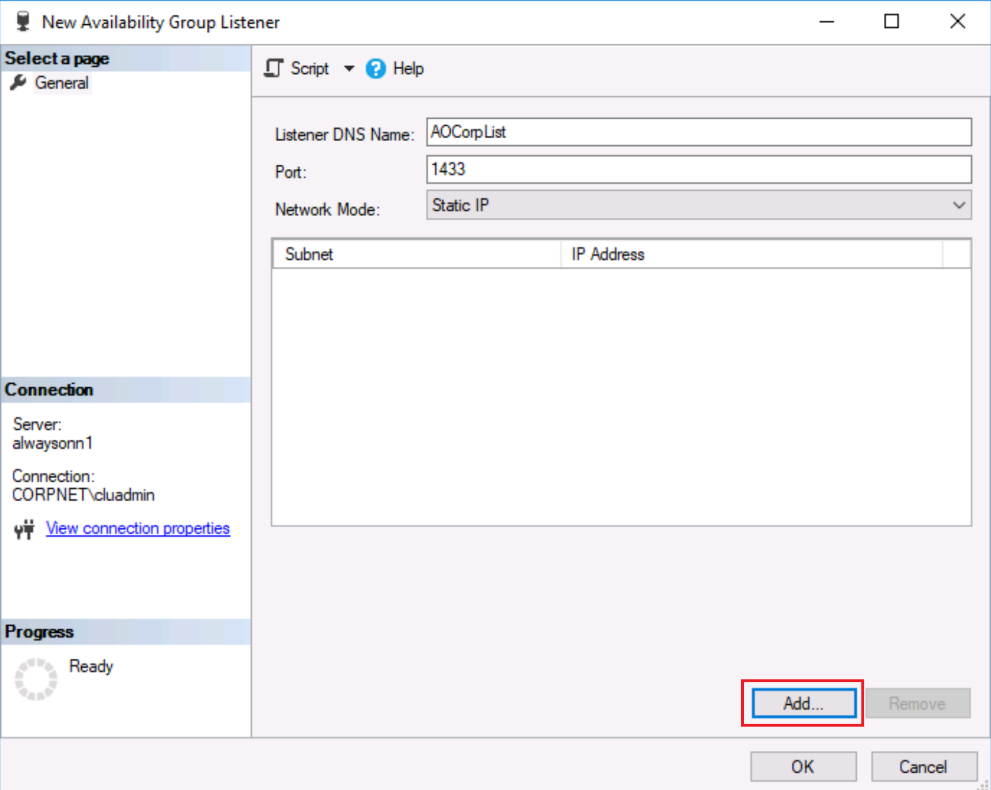
On the New Availability Group Listener dialog window, type in the following:
Listener DNS Name: AOCorpList
Port: 1433
Then click the drop down for Network Mode and select Static IP.

Selecting an Availability Group Listener Port
When configuring an availability group listener, you must designate a port. You can configure the default port to 1433 to allow for simplicity of the client connection strings. If using 1433, you do not need to designate a port number in a connection string. In addition, since each availability group listener will have a separate virtual network name, each availability group listener configured on a single WSFC can be configured to reference the same default port of 1433.
You can also designate a non-standard listener port; however, this means that you will also need to explicitly specify a target port in your connection string whenever connecting to the availability group listener. You will also need to open permission on the firewall for the non-standard port.
If you use the default port of 1433 for availability group listener VNNs, you will still need to ensure that no other services on the cluster node are using this port; otherwise, this would cause a port conflict.
If one of the instances of SQL Server is already listening on TCP port 1433 via the instance listener and there are no other services (including additional instances of SQL Server) on the computer listening on port 1433, this will not cause a port conflict with the availability group listener. This is because the availability group listener can share the same TCP port inside the same service process. However, multiple instances of SQL Server (side-by-side) should not be configured to listen on the same port.
Now at the bottom right of the dialog window click the Add button to add an IP address
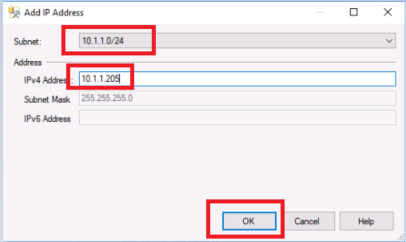
In the Add IP Address dialog, select the 10.1.1.0/24 subnet and type 10.1.1.205 as shown below. Click OK.
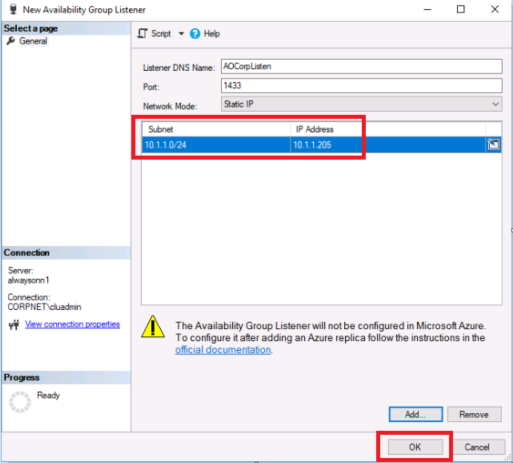
In the New Availability Group Listener dialog, click OK.
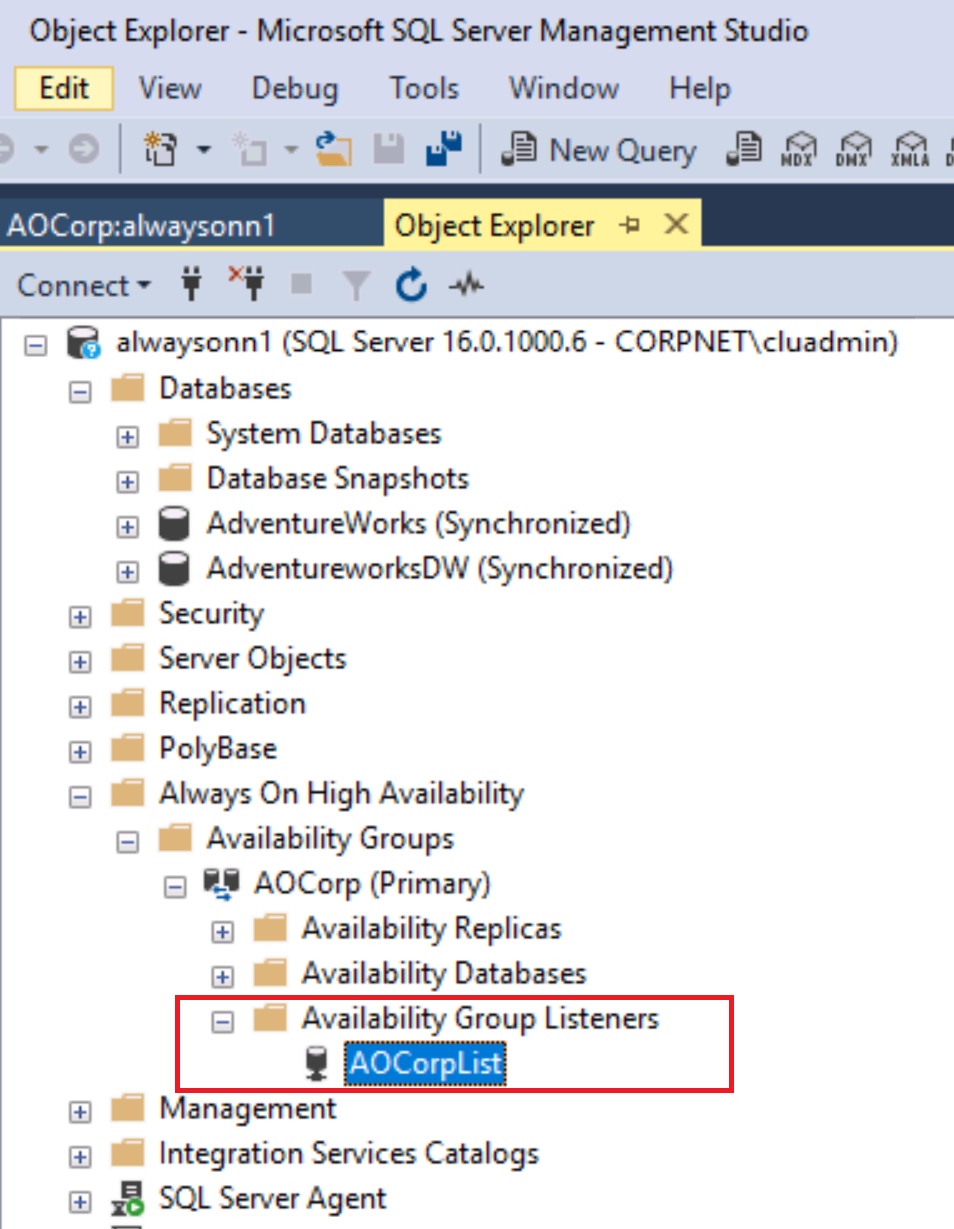
Upon successful completion, you should now see a listener in the Object Explorer.
Congratulations!
You have successfully completed this exercise. Click Next to advance to the next exercise.
Exercise 5: Review the availability group dashboard
In this exercise, you will learn how to review the availability group dashboard
Task 1: Review the availability group dashboard
Login to the AlwaysOnClient virtual machine as CORPNET\cluadmin using Pa$$w0rd as the password.
Open SQL Server Management studio (SSMS)

Connect to all three nodes: AlwaysOnN1, AlwaysOnN2, AlwaysOnN3

Navigate to the AlwaysOn High Availability folder in the Object explorer and expand it. Then expand the Availability Groups folder to see the availability group, AOCorp we created.
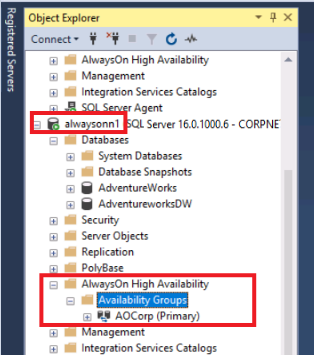
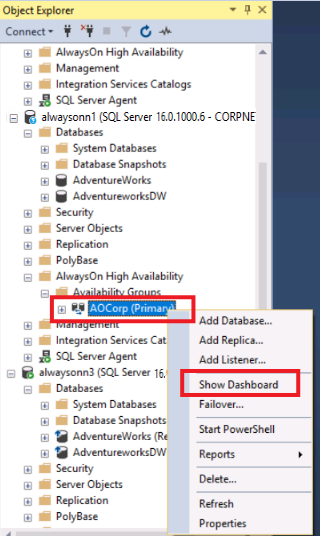
On whichever node shows as Primary, right click the AOCorp availability group and select SHOW DASHBOARD
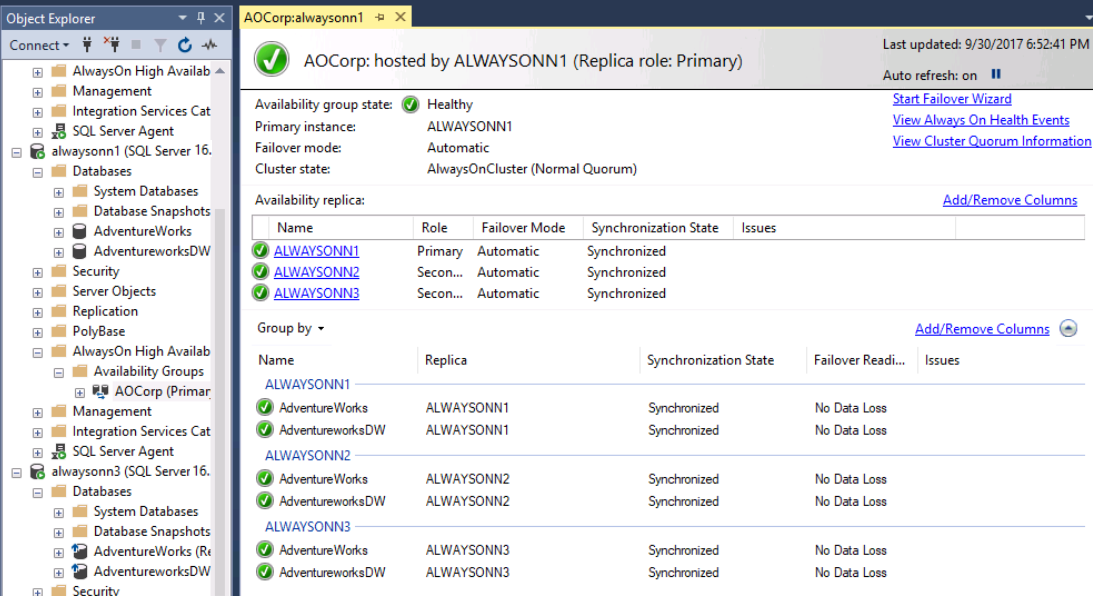
Click on the various links to see status and different information about the availability group. Some of the things you can do on the dashboard are:
- View AlwaysOn Health Events
- View Cluster Quorum Configuration
- Add/Remove various columns for the different databases
Congratulations!
You have successfully completed this exercise. You can move to the next lab.